
Assemble the stack
Complete the Sandwich
Now that you have the Arduino and USB Host shield set up, the next step is to start putting the rest of it together!
Unplug the Arduino if it's still plugged in to your computer then put your Shadow Master Shield onto it so the order of your boards should be:
- Arduino (bottom)
- USB Host Shield (middle)
- SHADOW Master (top)
Replace the ESC for your car
SHADOW doesn't like to work with the stock ESC from Traxxas. Luckily the RC world is one geared towards customization and this is extremely easy and requires very few tools!
Tools Necessary
- A sharp hobby knife (like an X-Acto)
- Philips Head screwdriver (Size 1)
- Heat Gun (optional)
Steps
- Ensure the battery is unplugged before starting.
- Unscrew the Traxxas EC from the frame ( 2 x Washer Philips-head screws )
- Carefully cut the clear tube that protects the connectors for the Red and Black 10g wires connecting the ESC to the Motor. Tip: Take the hobby knife, turn it upside down (edge up) and put it underneath the clear cover in the middle of the connector and press in to bite into the plastic. Now, carefully twist the wire to cut the rest of the circle around the wire. This method lets you control the depth of the cut so you don't accidentally hit anything else.
- Unplug the connectors that you have uncovered, just pull the two sides apart, it may be stiff.
- Pull the wires out of the middle rear of the frame and set the OEM ESC to the side. Bag it and the screws if you want to hold onto it for later projects.
- Feed the Blue and Yellow wires back through where you pulled the Black and White ESC wires and connect as follows:
- ESC Blue <==> Motor Black
- ESC Yellow <==> Motor Red
- Place the T-connector / Deans adapter on the ESC Deans connector so you can plug in a batter.
- Use the double-sided tape pads to mount the new ESC and power switch so they don't flop all over the place.
- Now is a good time to test it with the original RC system
- Plug in the battery
- Turn on the RC controller
- Set the new power switch to "on"
- Pull the trigger until the car flies off the workbench because you forgot to raise the car up so the drive wheels were off the surface first.
- ( Optional ) Use the heat gun to cover the joined couplers with the heat shrink tubing that came with the new ESC.
Connect your stack to the car
Open the cover of the RC receiver inside the body of the Bandit. This is a little black box on the side, not the blue ESC in the middle rear. There will be at least 2 sets of wires, Black, Red, and White trios. One set goes out to the ESC (motor control) and the other goes to the steering servo up front. Remove these from the receiver unit keeping track of which plugged in where.
At this time, I put in a replacement set of wires (F/F 3-wire) for both so I could easily switch between using the RC receiver and the Shadow stack just by changing a few wires.
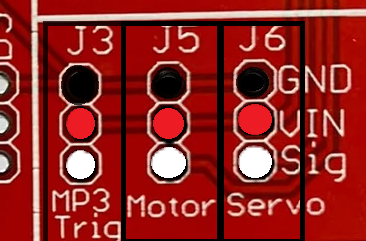
Now, take the original ESC and servo sets and plug them into your Shadow Master board.
The Master board makes this easy since there are headers and printed labels on the board for easy use.
Put the ESC wire where it says "motor" and the Server with the Servo. If you have a Sparkfun MP3 trigger you can also set up the 3-wires for that too.
Starting and Calibrate
Now we should be able to start testing.
- Plug in the battery
- Press the Playstation button on your controller, the indicator light should be blinking red
- Turn on the ESC (power switch to On)
- The controller red light should stop blinking and be a solid red to show it is connected.
- Servo Test
- Move the thumb stick to the left and right, ensure the steering moves accordingly.
- Motor Test
- Pull the L2 trigger slowly, or quickly, if you want to launch your car, to test the forward throttle
- Release L2 until it stops, then hold the L1 upper trigger button and pull the L2 trigger to test reverse and release again to stop.
- Sound Test ( if you plugged in a speaker )
- Press the D-pad directions and Circle and Cross buttons, each should trigger sound
No Comments